The little girl's room I did some altering to. I had a chair with a heart on it that was slightly above scale, and a rocker that was the right scale... and I cut down the seat and the back of the chair, and swapped the sides out for the rockers. Turned out really cute, I think. The shelf/wardrobe was actually a too-large scale dish storage for a dining room, but I think it'll work out nicely for a storage unit for the girl's room. Also have the bed, desk, and desk chair.. and that weird oval with the heart will be a wall mirror with some foil on it. Will be done in shades of pink, with pink carpeting.
The boy's room has a lot of the same things, but I didn't want it to be the same exactly. The second bed and desk set was taken from the other set of furniture I got for "my" house that I'll build later, because I don't plan to have kid's rooms in that house. Again, desk, chair, bed, wardrobe, and funny oval wall mirror. I gave the rocking horse to the little boy, since the girl has the rocking chair. I will probably use the green carpeting I have for "my" house, since a bedroom ought to have nice fuzzy carpeting, not hardwood.. and pink for the boy... *gasp* .. poor kid. Will probably do the room in light green or blue paint.
The living room is where things get interesting. On the right, I have the living room furniture that came with the half scale kit - couch, two easy chairs, the end table, and a coffee table. They seem very small in scale, but I have a feeling with the small scale of the house, that will seem to be an advantage when fitting things in. In previous posts, I mentioned I'd gotten a fireplace kit. Well, it came with a floor lamp and a grandfather clock. They all are in a slightly large scale, however, I'm fairly sure I can get away with the scale of the fireplace. Obviously, the fireplace hasn't been fully put together.. after doing some dry-fitting, I decided it's going to be FAR easier to glue and finish it as I build it, so I stopped with dry fitting after I figured out how it goes together and that it would fit together. The lamp... looked odd, and I put it aside to decide what to do with later. Now.. the grandfather clock... was too tall to even sort of look realistic... not to mention, it wouldn't have fit in under the cieling. After putting it together and deliberating for a while, I thought about just cutting part of the middle out and glueing it back together... but I couldn't figure out how well I'd be able to hide the buchering. Then, I thought of the mantel clock my hubby and I just ordered... and it occurred to me I could just cut off the whole bottom of the clock and make it a mantel clock... so off I went with pencil, saw, and ruler... and... somehow, it actually turned out okay. I cut a little rectangle piece that I will glue for a bottom inside the clock, and support, but you can't see it in the picture. It's also a little hard to see, but the stamping on the front of the clock actually has the hands and clock ticks and everything, so I couldn't bear NOT to use the clock. I think I may do the clock in wood stain, at least the face of it, if not the rest too. The room itself will be done with hardwood floor and shades of pink on the wall... although I *may* use the pink carpeting on the floor, with some of the latex flagstone sheet I have under the fireplace as a hearth.
I also have some furniture I plan to use in the entry room/ foyer of the house, which I'll do in hardwood with a dark pink. The weird pole-looking thing was actually the pendulum from the above kit-bashed grandfather clock.. and sitting there looking at it.. it occured to me I could take the bizarre "feet" from what's supposed to be the standing mirror, put them on the sides, and add hooks to the top.. and make a passable coat rack. I'd rather have the "hall mirror" stuck to the wall anyway, it saves room. The crude triangle piece of wood will be the hooks for the coat rack, but I haven't finished carving them yet. I also have the little hall table and the piano and bench planned for the foyer - because I don't think I want to have a whole room set up for the music room... and having a beautifully stained piano would be a nice show-piece for an entry way.. least, I think so.. Again, floor will be hardwood, with probably a darker pink on the walls.
The bathroom fixtures are going to need glue - and I have an idea that I'd like to put some sort of wall mirror behind the sink, but I haven't exactly decided on that. Will be done with hardwood floors and shades of blue on walls.
The office is fairly simple, and whether I actually make a whole room dedicated to the office, or add the bookshelf to another room and put the dad's desk in the master bedroom, I don't know. Depends on how things are fitting into the tiny house. I may omit the room entirely. I figure tiny gold beads will work on the front of the desk for "drawer handles" .. or, at least the look of them. I haven't decided on color scheme.. but being that it's an office, it'll probably be done with hardwood floors.
I have a little bit of the porch/outdoor furniture done. I don't plan to use the half scale garden kit I bought on this house, rather I'll save it for "my" house, that I think I'll actually use more as a showpiece than play, and I'll do some landscaping and garden work. What do most kids want with a gazebo and garden furniture anyways?... Not much. Instead, I have a slide / playground for the kids, and a swinging pirate ship toy to go outside.. so these chairs will be for the "poor" parents or babysitters that have to roast in the sun to watch the kids play.. hehe.
The dining room is where my biggest dilemma is. I wasn't particularly fond of the chair design that came with the dining room table in the half scale furniture set I got (on the right), so I ordered a dining room set - which unfortunately seems to be made in one inch scale (pictured on the left). I'm not altogether sure what to do with it.. cutting the table's legs off will easily scale it down, however the chairs will not be so easy. The original dining table (right) is SO tiny I can't imagine any family of four eating at it - however, I do have to take into consideration that the rooms are small in the house. I'd rather use the larger table if at all possible (dining room will be one of the larger ground floor rooms), but I think I may have to wait on that decision until the house is built. I'd love to figure out a way to down-scale the chairs without the arms... but I'm not sure sanding the chair backs a bit shorter and cutting the legs a bit down will do it. I think I may try it anyway, because I have no use for the big chairs (I don't have any intention of ever building miniatures larger than 1/2 scale) .. and the kit was cheap (6 bucks).. so I figure if I destroy the chairs, no such loss. It was worth it for the little storage unit I stole from this kit (and the duplicate one I got for "my" house) for the two kid's rooms. The little lampshade was part of the lamp/grandfather clock/fireplace kit I got, and I had the option of just cutting down the floor lamp stand to make it shorter for the living room, but it just looked weird. So... I pulled off the lamp shade, and it occurs to me I could probably easily hang it above the dining room table as a chandelier (or just stick it to the cieling).. and the oval base for the lamps... work out well as oval wall mirrors for the kid's rooms. As much as I like the smaller table's design, the top of it does look as though it could be a wall mirror for the bathroom- could even use beads to make candle sconces on the sides where the holes are.. but obviously, I'll wait on that until I can decide whether I'll be able to use the larger table. This room will be hardwood with the little pink oval rug under the table for an accent.
I only have the one piece of "kitchen" furniture from the half scale kit, so I ordered a kitchen kit ... which again turned out to be a bit large in scale. I built the over-the-counter cupboard, which is really kinda cute, and at worst case scenario, could easily be used as a pantry instead. My fingers were very sore from punching out wood panels by this point and putting things together, so I didn't finish putting the kitchen kit together. Additionally, I think to get it scaled better, I'm going to need to do a little kit bashing, but I *think* it'll be possible to get it downscaled. I'm not entirely sure what to do for decorating scheme.. I'd love to do some sort of white/pink tile look.. but I'm not quite sure how. Barring that, I'll go with hardwood flooring and pink scheme to match the rest of the ground floor.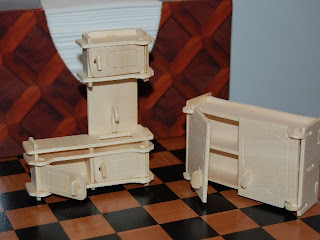
By this point of the day, my hubby had been home from work for a while, and my hands were killing me, so I cleaned up and put things away for a couple days.. but I feel confident that I got a bunch done while I had the chance!
Oh, final note.. I also found a little barn kit, and a convertible car.. both of which are about the right scale. The barn will need to be kit bashed a bit to have working doors (I think), but with my daughter's love of animals, she'll be thoroughly happy to have a little barn to match her house. I have a bunch of tiny woodcraft kits of animals to go with the barn, and it also came with a little bicycle and scooter- which, I have no idea if they'll work or not, but if they do, hooray, more outdoor toys for the kids!


 I also discovered a paint mixer that texturizes any color of paint, and painted the "ceiling" of the first floor with a textured white. It looks lovely. Used white acrylic to prime the floor I'm going to be carpeting, as well as the side walls, Then added a second coat of white on the windows part (because the windows inside is going to stay white).

 Stained some skinny sticks for the baseboards in the same stain as the floors that will stay hardwood, and measured skinny sticks to trim the inside of the windows on the two first walls. After some deliberation, I decided I liked the look of the skinny sticks stained (plus the ease of staining vs. picking out contrast trim colors in each room appealed..) and so I cut, sanded and stained all of the trim for the inside of the windows on those two walls. Of course, one of the two walls with windows in the beginning of the structure is the one I haven't finished sanding, so I didn't actually assemble anything.
  I am going to assemble in inside trim on the windows before gluing those first two outside wall, the inside support wall, and the ground floor together. Really pleased with how it's coming together, took some pictures as I went, but camera battery died, so I will have to wait to post them. I also had to clean up in a hurry because daughter came home early... thank god I wasn't in the middle of painting!! My husband ran interferance at the front door, keeping her out until I got the room clear of anything possibly incriminating... so far so good on keeping the secret.